Showing posts with label Database. Show all posts

Create or Copy Database in Android

Yesterday i spent whole day behind using my database i mean database is created i just require to use it in app. And i came across many problems, Some of them were really annoying and confusing. For some of them you can find online solution but some are really unknown like null pointer exception or getWritableDatabase method called recursively etc. even if there is table and also data in it.   some times it also happens you can not copy big database and it is also big problem in android. 
For that you have to dig up in to your code. You have to debug your app and in android studio it is also tedious task.  so to save your time and without doing all this you can copy database from assets folder to internal storage. Just go through the full tutorial and i hope it will solve all problems regarding coping database.

Step - 1.  Put below code in your SQLiteOpenHelper Class file. you have to put this code in onCreate method. if you have done some other task in oncreate method then rearrange it after this code. this code will check if database exist then do nothing because if you won't check it will overwrite your database every time you call   getWritableDatabase Or getReadableDatabase Method. beacuse it call onCreate method internally.

Step - 2. From your Main Activity only first time call Oncreate method of  SQLiteOpenHelper Class. so for the first time it will create or copy your database. if your database is big you can display progress bar for loading process.

DbHelper.java

package com.androprogrammer.dbdemo;

import android.content.ContentValues;
import android.content.Context;
import android.database.Cursor;
import android.database.SQLException;
import android.database.sqlite.SQLiteDatabase;
import android.database.sqlite.SQLiteOpenHelper;
import android.util.Log;

import java.io.File;
import java.io.FileOutputStream;
import java.io.IOException;
import java.io.InputStream;
import java.io.OutputStream;


public class DbHelper extends SQLiteOpenHelper 
{
 public static final String DB_NAME = "mydb.db";
 public static final int version = 1;
 public static final String product_table = "tblproduct";
 public static final String order_id = "_id";
 public static final String pname = "pname";
 public static final String desc = "desc";
 public static final String quantity = "quantity";
 public static final String rating = "rating";
 
 private SQLiteDatabase ourdb;
 public Context cont;

 public DbHelper(Context context)
 {
  // TODO Auto-generated constructor stub
  super(context, DB_NAME, null, version);
  this.cont = context;
 }

 @Override
 public void onCreate(SQLiteDatabase db)
    {
        try
        {
            File dbFile = cont.getDatabasePath(DB_NAME);

            if (dbFile.exists())
            {
                //Toast.makeText(cont, "Database Already Exist..." , Toast.LENGTH_LONG).show();
            }
            else
            {
                this.getReadableDatabase();

                InputStream input = cont.getAssets().open(DB_NAME);
                int size = input.available();
                input.close();

                if (size > 0)
                {

                    Log.d("file" , dbFile.getPath());

                    copyDataBase(dbFile);
                    //this.close();
                }
                else
                {
                    // TODO Auto-generated method stub
                    db.execSQL("create table " + product_table +" ( "+ order_id + " INTEGER PRIMARY KEY AUTOINCREMENT , " + pname + " TEXT NOT NULL ," + desc + " TEXT ,"
                            + rating + " INTEGER ," + quantity +" INTEGER );");
                }
            }
        } catch (IOException e) {
            e.printStackTrace();
        }

        this.ourdb = db;

 }

 @Override
 public void onUpgrade(SQLiteDatabase db, int oldVersion, int newVersion) {
  // TODO Auto-generated method stub
  
 }

    /**
     * Copies your database from your local assets-folder to the just created empty database in the
     * system folder, from where it can be accessed and handled.
     * This is done by transfering bytestream.
     *
     * @param dbFile*/
    private void copyDataBase(File dbFile) throws IOException {

        //Open your local db as the input stream
        InputStream myInput = cont.getAssets().open(DB_NAME);

        //Open the empty db as the output stream
        OutputStream myOutput = new FileOutputStream(dbFile);

        //transfer bytes from the inputfile to the outputfile
        byte[] buffer = new byte[1024];
        int length;
        while ((length = myInput.read(buffer))>0)
        {
            myOutput.write(buffer, 0, length);
            Log.d("buf", "" + length);
        }

        //Close the streams
        myOutput.flush();
        myOutput.close();
        myInput.close();

    }
  
 public DbHelper open() throws SQLException
 {
        if (this.ourdb == null)
        {
           this.ourdb = this.getWritableDatabase();
        }

  return this;
 }

 public synchronized void close()
 {
        if(this.ourdb.isOpen())
      this.ourdb.close();
 }

 public long insert(String name, String des, Float ratings, int quan) throws SQLException
 {
  // TODO Auto-generated method stub
  ContentValues cv = new ContentValues();
  cv.put(pname, name);
  cv.put(desc, des);
  cv.put(rating, ratings);
  cv.put(quantity, quan);
  return this.ourdb.insertOrThrow(product_table, null, cv);

 }

 public Cursor getAllData() throws SQLException
 {
  // TODO Auto-generated method stub
  String [] colums = new String[]{order_id ,pname ,desc ,rating ,quantity};
  Cursor c = this.ourdb.query(product_table,colums, null, null, null, null, null, null);
  return c;
 }

}


As you can see i have even checked if there is no file in assets folder it will create blank database so application won't crash. because it create bad impect when you publish your app in Google play store and it crash so for safety side you can do this. then you can update it later on. now from your main activity just call the onCreate method for that put below code in it.

SQLiteDatabase db = null;
DbHelper helper = new DbHelper(Main.this);
helper.onCreate(db);

Now your database file created or copied so just check it if you have created display method or activity then open it and check it. you can see in debug window also because i have used Logger to know weather database is copied or not so check debug window in editor. now from all other class or activity just call open method. for that put below code in it.

DbHelper helper = new DbHelper(this);
helper.open();

The open method will return instance of database after checking weather it is opened or not. ok now run your app and see the result. if you find any error or if you have any query let me know. Comment in below comment box. it may happen you may find some new error then also let me know so other can also solve that and i will try my best to solve that problem. i have also written tutorial about add, update and display records from database so if you have any query regarding that also check this out.
Keep coding ...  

How to Open SQLite Database File ??

Well you have done all procedure for creating database and add entry but when you fetch records there is no record found so how you overcome this problem ?  or How to get Database file from my project in eclipse ? there are many question around it(Same questions) and today in this tutorial(For android) I am going to show you how and which tool you can use. Sql lite browser  is best and open source tool which you can use to open your database file. But how you find your database file. 

OK I am gone show you step by step procedure which you can follow to find your data base file and open it in this tool so you can find your problem solution. Lets say you have problem or error say no table or view find so you can open database file and can see which table or view exist. Sqllite browser tool allow you to perform all operation over database like insert, update , delete and fire trigger or procedure over database.

  • Start your emulator (it is must).
  • Now to get your database file open DDMS view in eclipse and go to file explorer Tab .
  • In data/data find your application folder (name is same as your package name).
  • In your package folder  go to database folder where you find your database file just like this image (1 in image).

  • To export it click on first option of the menu (2) and export it to the desktop or any where you want.
  • Now download sqlite browser from here.
  • Now extract it from zip file using and extractor (7zip,winrar).
  • Run sqlite.exe given in folder now drag your data base file in it.
  • It will look like below image.


As you can see it display all tables and View available in my db file. So now you can find out what mistake you have done in database coding and can solve your error. You can also find Tutorial on database which cover all operations. 
If you have any query post it into the below comment section.
Keep coding and cheers …  

Database Demo : Database Operations with Cursor Adapter Class Part-2

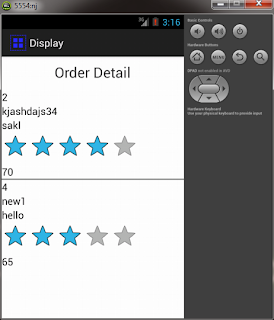
In this tutorial I will display inserted record and  update and delete row.  To display all records in list view you have to use Cursor Adapter class which allow you to set layout of your list item (Row) layout. When user click on list item it will redirect to update activity and onItemLongclick method.  it will ask for delete the row from database and also update list view. In Database Demo : Database Operations with Cursor Adapter Class Part-1 i have already done insert into the database. I hope you have seen that tutorial so you can understand this tutorial. On update and delete you have to do two simultaneous work update database and also update list view. 

Cursoradapter.java

package com.example.dbdemo;

import android.content.Context;
import android.database.Cursor;
import android.view.LayoutInflater;
import android.view.View;
import android.view.ViewGroup;
import android.widget.CursorAdapter;
import android.widget.RatingBar;
import android.widget.TextView;

public class Cursoradapter extends CursorAdapter {

 public Cursoradapter(Context context, Cursor c) {
  super(context, c);
  // TODO Auto-generated constructor stub
 }
 @Override
 public View newView(Context con, Cursor c, ViewGroup arg2) {
  // TODO Auto-generated method stub
  
  LayoutInflater inflater = (LayoutInflater) con.getSystemService(con.LAYOUT_INFLATER_SERVICE);

        View retView = inflater.inflate(R.layout.list_item, null);
 
        return retView;
 }

 @Override
 public void bindView(View v, Context con, Cursor c) {
  // TODO Auto-generated method stub
  TextView id = (TextView) v.findViewById(R.id.row_tv0);
  TextView pname = (TextView) v.findViewById(R.id.row_tv1);
  TextView des = (TextView) v.findViewById(R.id.row_tv2);
  RatingBar rb = (RatingBar) v.findViewById(R.id.row_rating);
  TextView qty = (TextView) v.findViewById(R.id.row_tv3);
  
  id.setText(c.getString(c.getColumnIndex(c.getColumnName(0))));
  pname.setText(c.getString(c.getColumnIndex(c.getColumnName(1))));
  des.setText(c.getString(c.getColumnIndex(c.getColumnName(2))));
  rb.setRating(c.getFloat(c.getColumnIndex(c.getColumnName(3))));
  rb.setIsIndicator(true);
  qty.setText(c.getString(c.getColumnIndex(c.getColumnName(4))));
  
 }
 
 @Override
 protected void onContentChanged() {
  // TODO Auto-generated method stub
  super.onContentChanged();
  notifyDataSetChanged();
 }

}


list_item.xml


display.xml

androprogrammer.com


display.java
package com.example.dbdemo;

import android.app.Activity;
import android.app.AlertDialog;
import android.content.DialogInterface;
import android.content.Intent;
import android.database.Cursor;
import android.os.Bundle;
import android.os.Handler;
import android.view.Menu;
import android.view.View;
import android.widget.AdapterView;
import android.widget.AdapterView.OnItemClickListener;
import android.widget.AdapterView.OnItemLongClickListener;
import android.widget.ListView;
import android.widget.RatingBar;
import android.widget.TextView;

public class Display extends Activity implements OnItemClickListener  {

 ListView lv;
 Cursoradapter adapt;
 Cursor c;
 @Override
 protected void onCreate(Bundle savedInstanceState) {
  super.onCreate(savedInstanceState);
  setContentView(R.layout.activity_display);
  
  lv = (ListView) findViewById(R.id.listView1);
  final DbHelper helper = new DbHelper(this);
  helper.open();

  new Handler().post(new Runnable() {
            @Override
            public void run() {
             c = helper.getAllData();
             adapt = new Cursoradapter(Display.this, c);
          lv.setAdapter(adapt);
            }
        });
  
  
  lv.setOnItemClickListener(this);
  lv.setOnItemLongClickListener(new OnItemLongClickListener() {

   @Override
   public boolean onItemLongClick(AdapterView arg0, View v,
     int position, long arg3) {
    // TODO Auto-generated method stub
    TextView id = (TextView) v.findViewById(R.id.row_tv0);
    final int ids = Integer.parseInt(id.getText().toString());
    AlertDialog.Builder ad = new AlertDialog.Builder(Display.this);
    //ad.setTitle("Notice");
    ad.setMessage("Sure you want to delete item ?");
    ad.setPositiveButton(android.R.string.ok, new DialogInterface.OnClickListener() {
     
     @Override
     public void onClick(DialogInterface dialog, int which) {
      //Delete of record from Database and List view.
      helper.delete(ids);
      c.requery();
      adapt.notifyDataSetChanged();
      lv.setAdapter(adapt);
     }
    });
    ad.setNegativeButton(android.R.string.cancel, new DialogInterface.OnClickListener() {
     
     @Override
     public void onClick(DialogInterface dialog, int which) {
      // TODO Auto-generated method stub
     dialog.dismiss();
     }
    });
    ad.show();
    return false;
   }
  }); 
    
 }

 @Override
 public boolean onCreateOptionsMenu(Menu menu) {
  // Inflate the menu; this adds items to the action bar if it is present.
  getMenuInflater().inflate(R.menu.display, menu);
  return true;
 }


 @Override
 public void onItemClick(AdapterView arg0, View v, int position, long arg3) {
  // TODO Auto-generated method stub
  TextView id = (TextView) v.findViewById(R.id.row_tv0);
  TextView pname = (TextView) v.findViewById(R.id.row_tv1);
  TextView des = (TextView) v.findViewById(R.id.row_tv2);
  RatingBar rb = (RatingBar) v.findViewById(R.id.row_rating);
  TextView qty = (TextView) v.findViewById(R.id.row_tv3);
  
  int ids = Integer.parseInt(id.getText().toString());
  String pn = pname.getText().toString();
  String d = des.getText().toString();
  float r = rb.getRating();
  int q = Integer.parseInt(qty.getText().toString());
  
  Intent updat = new Intent(Display.this,Updatedata.class);
  
  updat.putExtra("id", ids);
  updat.putExtra("pname", pn);
  updat.putExtra("desc",d);
  updat.putExtra("rat",r);
  updat.putExtra("qty",q);
  
  
  startActivityForResult(updat,101);
  
 }

 @Override
 protected void onActivityResult(int requestCode, int resultCode, Intent data) {
  // TODO Auto-generated method stub
  super.onActivityResult(requestCode, resultCode, data);
  
  if (resultCode == RESULT_OK) {
   switch (requestCode) {
   case 101:
    
    c.requery();
    adapt.notifyDataSetChanged();
    lv.setAdapter(adapt);
    break;
   }
  }
 }

}

Now if user just click on list view item it will be redirect to the update activity. so check out onItemClick method code. it will send clicked item information to update activity so user won't require to enter all data again.
update_data.xml

androprogrammer.com


Updatedata.java
package com.example.dbdemo;

import android.app.Activity;
import android.content.Intent;
import android.os.Bundle;
import android.view.Menu;
import android.view.View;
import android.widget.Button;
import android.widget.EditText;
import android.widget.RatingBar;

public class Updatedata extends Activity {

 Button update,cancel;
 EditText pname,desc,qty;
 RatingBar rb;
 DbHelper helper;
 @Override
 protected void onCreate(Bundle savedInstanceState) {
  super.onCreate(savedInstanceState);
  setContentView(R.layout.update_data);
  
  update = (Button) findViewById(R.id.update_save);
  cancel = (Button) findViewById(R.id.update_cancel);
  pname = (EditText) findViewById(R.id.update_et1);
  desc = (EditText) findViewById(R.id.update_et2);
  qty = (EditText) findViewById(R.id.update_et3);
  rb = (RatingBar) findViewById(R.id.update_rb);
  
  Intent dis = getIntent();
  Bundle data = dis.getExtras();
  final int id = data.getInt("id");
  String pn = data.getString("pname");
  String d = data.getString("desc");
  float r = data.getFloat("rat", 0);
  int q = data.getInt("qty");
  
  pname.setText(pn);
  desc.setText(d);
  rb.setRating(r);
  qty.setText(""+ q);
helper = new DbHelper(Updatedata.this);
    helper.open();
  
  update.setOnClickListener(new View.OnClickListener() {
   
   @Override
   public void onClick(View v) {
    // TODO Auto-generated method stub
    
    
    String name = pname.getText().toString();
    String des = desc.getText().toString();
    int quan = Integer.parseInt(qty.getText().toString());
    
    helper.update(id,name,des,quan);
    
    helper.close();
    Intent display = new Intent(Updatedata.this,Display.class);
    setResult(RESULT_OK, display);
    finish();
   }
  });

  cancel.setOnClickListener(new View.OnClickListener() {
   
   @Override
   public void onClick(View v) {
    // TODO Auto-generated method stub
    helper.close();
    finish();
   }
  });
  
 }

 @Override
 public boolean onCreateOptionsMenu(Menu menu) {
  // Inflate the menu; this adds items to the action bar if it is present.
  getMenuInflater().inflate(R.menu.updatedata, menu);
  return true;
 }

}
Now Add this below code in DbHelper class before close method.
public void update(int id, String name, String des, int quan) {
  // TODO Auto-generated method stub
  ContentValues values = new ContentValues();
  values.put(pname, name);
  values.put(desc, des);
  values.put(quantity, quan);
  
  ourdb.update(product_table, values, order_id +" = "+ id , null);
 }

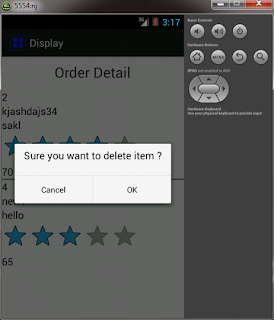
And Last Operation delete i have wrriten delete logic in List view OnItemLongClick method. so when user(Admin) Long press on List item. Alert dialog will popup to confirm delete operation. so now add this below code in DbHelper class for deleting row from Database after Update Method. delete method get id from list item and perform delete operation on the bases of it.
public void delete(int ids) {
  // TODO Auto-generated method stub
  ourdb.delete(product_table, order_id + " = " + ids, null);
 }
androprogrammer.com

After update or delete you have to update view of list also. so to update you have to requery cursor object.like this
c.requery(); adapt.notifyDataSetChanged();
One more thing you have to take consider is when you use rating bar in list view list view onItemClick method won't work so if you are facing this you have to setthis property.
rb.setIsIndicator(true);
So,that's lots of coding out require for all these operation. i know this is somehow confusing but when you do by yourself you will get this. if you have any query or problem then comment in below comment box.
You can download code from here.
Keep Coding and cheers.....

Database Demo : Database Operations with Cursor Adapter Class Part-1

         SQLite is best and lite weight database in mobile operating system. you can do all operation in SQLite like in all other database. If you have Lots of Records and want to display all detail of database you can use list view using different component of android like Text view ,Rating bar, Button etc .You can do main 4 types of operation on database like Select, update, delete and display. I will do all these operation but it having too much coding so I am gone break this in 2 part. So this is part-1 of database operation and I am gone cover insert and database helper class which is for connection between application and database. i have written all methods in this class so if i want any method like insert or update or create i can use this in all activity. This is re-usability of code so you don't have to write code in each activity. in this tutorial and in part-2 display, update and delete operation will be explain. In this tutorial I have used Product table in which user(Admin) can add product detail like name, description , rating or star to the product and available quantity.

Main.xml

androprogrammer.com


Main.java
package com.example.dbdemo;

import android.app.Activity;
import android.content.Intent;
import android.os.Bundle;
import android.view.Menu;
import android.view.View;
import android.widget.Button;

public class Main extends Activity {

 Button insert,view;
 public static boolean isDbCreated = false;
 
 @Override
 protected void onCreate(Bundle savedInstanceState) {
  super.onCreate(savedInstanceState);
  setContentView(R.layout.activity_main);
    
  insert = (Button) findViewById(R.id.button1);
  view = (Button) findViewById(R.id.button4);
  
  insert.setOnClickListener(new View.OnClickListener() {
   
   @Override
   public void onClick(View v) {
    // TODO Auto-generated method stub
    Intent insert = new Intent(getApplicationContext(),InsertActivity.class);
    startActivity(insert);
   }
  });
  
  view.setOnClickListener(new View.OnClickListener() {
   
   @Override
   public void onClick(View v) {
    // TODO Auto-generated method stub
    Intent view = new Intent(Main.this,Display.class);
    startActivity(view);
   }
  });
  
 }
 
 @Override
 public boolean onCreateOptionsMenu(Menu menu) {
  // Inflate the menu; this adds items to the action bar if it is present.
  getMenuInflater().inflate(R.menu.main, menu);
  return true;
 }

}

activity_Insert.xml

androprogrammer.com


InsertActivity.java
package com.example.dbdemo;

import android.app.Activity;
import android.app.Dialog;
import android.os.Bundle;
import android.view.Menu;
import android.view.View;
import android.widget.Button;
import android.widget.EditText;
import android.widget.RatingBar;
import android.widget.RatingBar.OnRatingBarChangeListener;

public class InsertActivity extends Activity {

 Button save,cancel;
 EditText name,desc,quantity;
 RatingBar rb;
 float ratings;
 int quan = 0;
 @Override
 protected void onCreate(Bundle savedInstanceState) {
  super.onCreate(savedInstanceState);
  setContentView(R.layout.activity_insert);
  
  save = (Button) findViewById(R.id.btsave);
  cancel = (Button) findViewById(R.id.btcancel);
  
  name = (EditText) findViewById(R.id.editText1);
  desc = (EditText) findViewById(R.id.editText2);
  quantity = (EditText) findViewById(R.id.editText3);
  rb = (RatingBar) findViewById(R.id.ratingBar1);
  
  rb.setOnRatingBarChangeListener(new OnRatingBarChangeListener() {
   
   @Override
   public void onRatingChanged(RatingBar ratingBar, float rating,
     boolean fromUser) {
    // TODO Auto-generated method stub
    ratings = rating;
   }
  });
  
  final DbHelper helper = new DbHelper(InsertActivity.this);
  
  save.setOnClickListener(new View.OnClickListener() {
   
   @Override
   public void onClick(View v) {
    // TODO Auto-generated method stub
    boolean inserted = true;
    try {
      String pname = name.getText().toString();
      String des = desc.getText().toString();
      quan = Integer.parseInt(quantity.getText().toString());
      
      helper.open();
      helper.insert(pname , des , ratings , quan);
      
    } catch (Exception e) {
     // TODO: handle exception
     inserted = false;
     e.printStackTrace();
    }
    finally
    {
     if(inserted)
     {
      Dialog d = new Dialog(InsertActivity.this);
      d.setTitle("Success..");
      d.show();
     }
     helper.close();
     name.setText("");
     desc.setText("");
     quantity.setText("");
    }
   }
  });
  cancel.setOnClickListener(new View.OnClickListener() {
   
   @Override
   public void onClick(View v) {
    // TODO Auto-generated method stub
    finish();
   }
  });


 }

 @Override
 public boolean onCreateOptionsMenu(Menu menu) {
  // Inflate the menu; this adds items to the action bar if it is present.
  getMenuInflater().inflate(R.menu.insert, menu);
  return true;
 }

}

DbHelper.java
package com.example.dbdemo;

import android.content.ContentValues;
import android.content.Context;
import android.database.Cursor;
import android.database.SQLException;
import android.database.sqlite.SQLiteDatabase;
import android.database.sqlite.SQLiteOpenHelper;

public class DbHelper {

 public static final String DB_NAME = "mydb.db";
 public static final int version = 1;
 public static final String product_table = "tblproduct";
 public static final String Emp_table = "Employee";
 public static final String order_id = "_id";
 public static final String pname = "pname";
 public static final String desc = "desc";
 public static final String quantity = "quantity";
 public static final String rating = "rating";
 
 private SQLiteDatabase ourdb;
 private databaseHelper ourHelper;
 public Context ourContext;
 
 public DbHelper(Context c)
 {
  ourContext = c;
 }
 
 private class databaseHelper extends SQLiteOpenHelper 
 {

  public databaseHelper(Context context) {
   // TODO Auto-generated constructor stub
   super(context, DB_NAME, null, version);
  }

  @Override
  public void onCreate(SQLiteDatabase db) {
   // TODO Auto-generated method stub
   db.execSQL("create table " + product_table +" ( "+ order_id + " INTEGER PRIMARY KEY AUTOINCREMENT , " + pname + " TEXT NOT NULL ," + desc + " TEXT ," 
      + rating + " INTEGER ," + quantity +" INTEGER );");
  }

  @Override
  public void onUpgrade(SQLiteDatabase db, int oldVersion, int newVersion) {
   // TODO Auto-generated method stub
   
  }
  
 }
 
 public DbHelper open() throws SQLException
 {
  databaseHelper ourHelper = new databaseHelper(ourContext);
  ourdb = ourHelper.getWritableDatabase();
  return this;
  
 }
 
 public void close() 
 {
  ourdb.close();
 }

 public long insert(String name, String des, Float ratings, int quan) throws SQLException
 {
  // TODO Auto-generated method stub
  ContentValues cv = new ContentValues();
  cv.put(pname, name);
  cv.put(desc, des);
  cv.put(rating, ratings);
  cv.put(quantity, quan);
  return ourdb.insertOrThrow(product_table, null, cv);
  
  
 }
 
}


In this tutorial I have used only one table but you can take any number of table. one thing you have to consider is cursor require “_id” field as per android document. Cursor will fetch record on the basis of “_id” column so you have to add this field in your table. if you have any query or problem then post in below comment box.

Keep coding and cheers ... =D