Have Heard lots of about Android Material design but don't know from where to start, well in this tutorial i will tell you how to create app from scratch with material design. This tutorial is just a beginning of Material design tutorial. so i just keep it simple.
From Kitkat and all older version of android Google has given new overhaul with the Material design in Android 5.0 (Well known as Android Lollipop). with new Card view , Recycler view and some of the new animation it is really user friendly. User will love the animation in this version. So lets start new project with android api -21.
Step - 1 : Create New Android application and give name MainActivity to main activity and same name for layout file.
- minSdkVersion="21”
- targetSdkVersion="21"
Main.xml
    <android.support.v7.widget.recyclerview android:elevation="5dp" android:id="@+id/my_recycler_view" android:layout_height="match_parent" android:layout_marginleft="4dp" android:layout_marginright="4dp" android:layout_margintop="10dp" android:layout_width="match_parent" android:scrollbars="vertical">
    </android..support.v7.widget.recyclerview>
I have used frame layout. it allows to put component(widget/view) at any specific position. To create round button there are number of ways but i have used simple way of setOval method of outline class. this button is for sample in this tutorial. i will make use of it next tutorial so keep subscribed with us.now put below code for oval shape of it.
drawable/ripple.xml
Below one is layout for recycler view item. RecyclerView is also list view but with some extended features like list item remove or add animation and much more. so put below file in row_layout.xml file.
layout/row_layout.xml
Step - 2 : Now your layout is set but to apply your custom theme now add style.xml file in value-v21 folder and put below code in it. you can change color codes as per your app theme.
value-v21/styles.xml
Step - 3 : Now All layout set so we move to code section. this is start up with material design so i have used simple array to display values in recycler view. put below code in main.java file.
Main.java
package com.androprogrammer.test.myapplication1;
import android.app.Activity;
import android.graphics.Outline;
import android.os.Bundle;
import android.support.v7.widget.DefaultItemAnimator;
import android.support.v7.widget.LinearLayoutManager;
import android.support.v7.widget.RecyclerView;
import android.view.Menu;
import android.view.MenuItem;
import android.view.View;
import android.view.ViewOutlineProvider;
import android.widget.Button;
public class MainActivity extends Activity
{
private RecyclerView mRecyclerView;
private RecyclerView.Adapter mAdapter;
private RecyclerView.LayoutManager mLayoutManager;
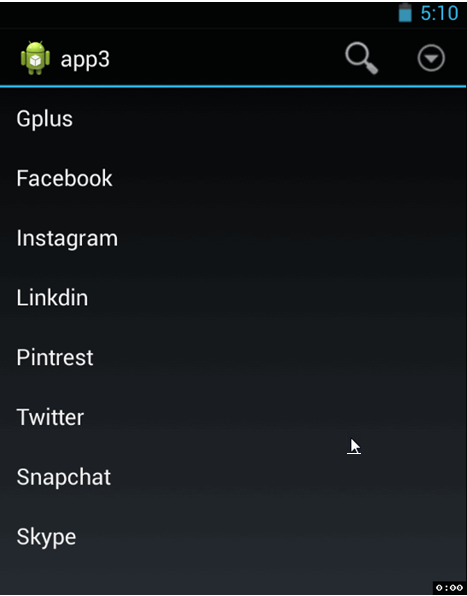
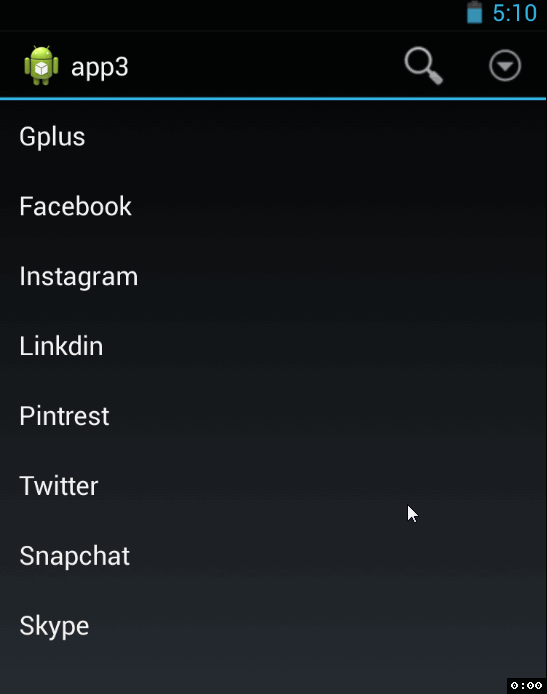
protected String [] myDataset = {"facebook", "Google+", "twitter", "Linkdin", "pintrest"};
@Override
protected void onCreate(Bundle savedInstanceState) {
super.onCreate(savedInstanceState);
setContentView(R.layout.activity_main);
mRecyclerView = (RecyclerView) findViewById(R.id.my_recycler_view);
Button fab = (Button) findViewById(R.id.addButton);
ViewOutlineProvider viewOutlineProvider = new ViewOutlineProvider() {
@Override
public void getOutline(View view, Outline outline) {
// Or read size directly from the view's width/height
outline.setOval(0, 0, 56, 56);
}
};
fab.setOutlineProvider(viewOutlineProvider);
// use this setting to improve performance if you know that changes
// in content do not change the layout size of the RecyclerView
mRecyclerView.setHasFixedSize(true);
// use a linear layout manager
mLayoutManager = new LinearLayoutManager(this);
mRecyclerView.setLayoutManager(mLayoutManager);
mRecyclerView.setItemAnimator(new DefaultItemAnimator());
// specify an adapter
mAdapter = new MyAdapter(myDataset);
mRecyclerView.setAdapter(mAdapter);
}
@Override
public boolean onCreateOptionsMenu(Menu menu) {
// Inflate the menu; this adds items to the action bar if it is present.
getMenuInflater().inflate(R.menu.menu_main, menu);
return true;
}
@Override
public boolean onOptionsItemSelected(MenuItem item) {
// Handle action bar item clicks here. The action bar will
// automatically handle clicks on the Home/Up button, so long
// as you specify a parent activity in AndroidManifest.xml.
int id = item.getItemId();
//noinspection SimplifiableIfStatement
if (id == R.id.action_settings) {
return true;
}
return super.onOptionsItemSelected(item);
}
}
MyAdapter.java
package com.androprogrammer.test.myapplication1;
import android.support.v7.widget.RecyclerView;
import android.view.LayoutInflater;
import android.view.View;
import android.view.ViewGroup;
import android.widget.TextView;
import android.widget.Toast;
/**
 * Created by wasim on 07/12/14.
 */
public class MyAdapter extends RecyclerView.Adapter<myadapter .viewholder=""> {
    protected String[] mDataset;
    // Provide a reference to the views for each data item
    // Complex data items may need more than one view per item, and
    // you provide access to all the views for a data item in a view holder
    public static class ViewHolder extends RecyclerView.ViewHolder {
        // each data item is just a string in this case
        public TextView mTextView;
        public ViewHolder(View v) {
            super(v);
            mTextView = (TextView) v.findViewById(R.id.row_tv);
            v.setOnClickListener(new View.OnClickListener() {
                @Override
                public void onClick(View v)
                {
                    Toast.makeText(v.getContext(), "Clicked on " + getPosition(), Toast.LENGTH_LONG).show();
                }
            });
        }
    }
    // Provide a suitable constructor (depends on the kind of dataset)
    public MyAdapter(String[] myDataset) {
        this.mDataset = myDataset;
    }
    // Create new views (invoked by the layout manager)
    @Override
    public MyAdapter.ViewHolder onCreateViewHolder(ViewGroup parent,
                                                   int viewType) {
        // create a new view
        View v = LayoutInflater.from(parent.getContext())
                .inflate(R.layout.row_layout, parent, false);
        // set the view's size, margins, paddings and layout parameters
        ViewHolder vh = new ViewHolder(v);
        return vh;
    }
    // Replace the contents of a view (invoked by the layout manager)
    @Override
    public void onBindViewHolder(ViewHolder holder, int position) {
        // - get element from your dataset at this position
        // - replace the contents of the view with that element
        holder.mTextView.setText(mDataset[position]);
    }
    // Return the size of your dataset (invoked by the layout manager)
    @Override
    public int getItemCount() {
        return mDataset.length;
    }
}
RecyclerView.Adapter is extened like other adapters in android. view more about adapters in my previous post. in this class you have to implement view holder pattern that will assign view to each row. well there is no more changes in recycler view then list view. in list view adapter you assign view in getView method while in this case you can assign data in onBindViewholder method.
Screen Shots


So that's it from coding side now you can run app and test it. i hope you it will run smoothly.
if you have any query comment it in below comment box.
Keep coding...